
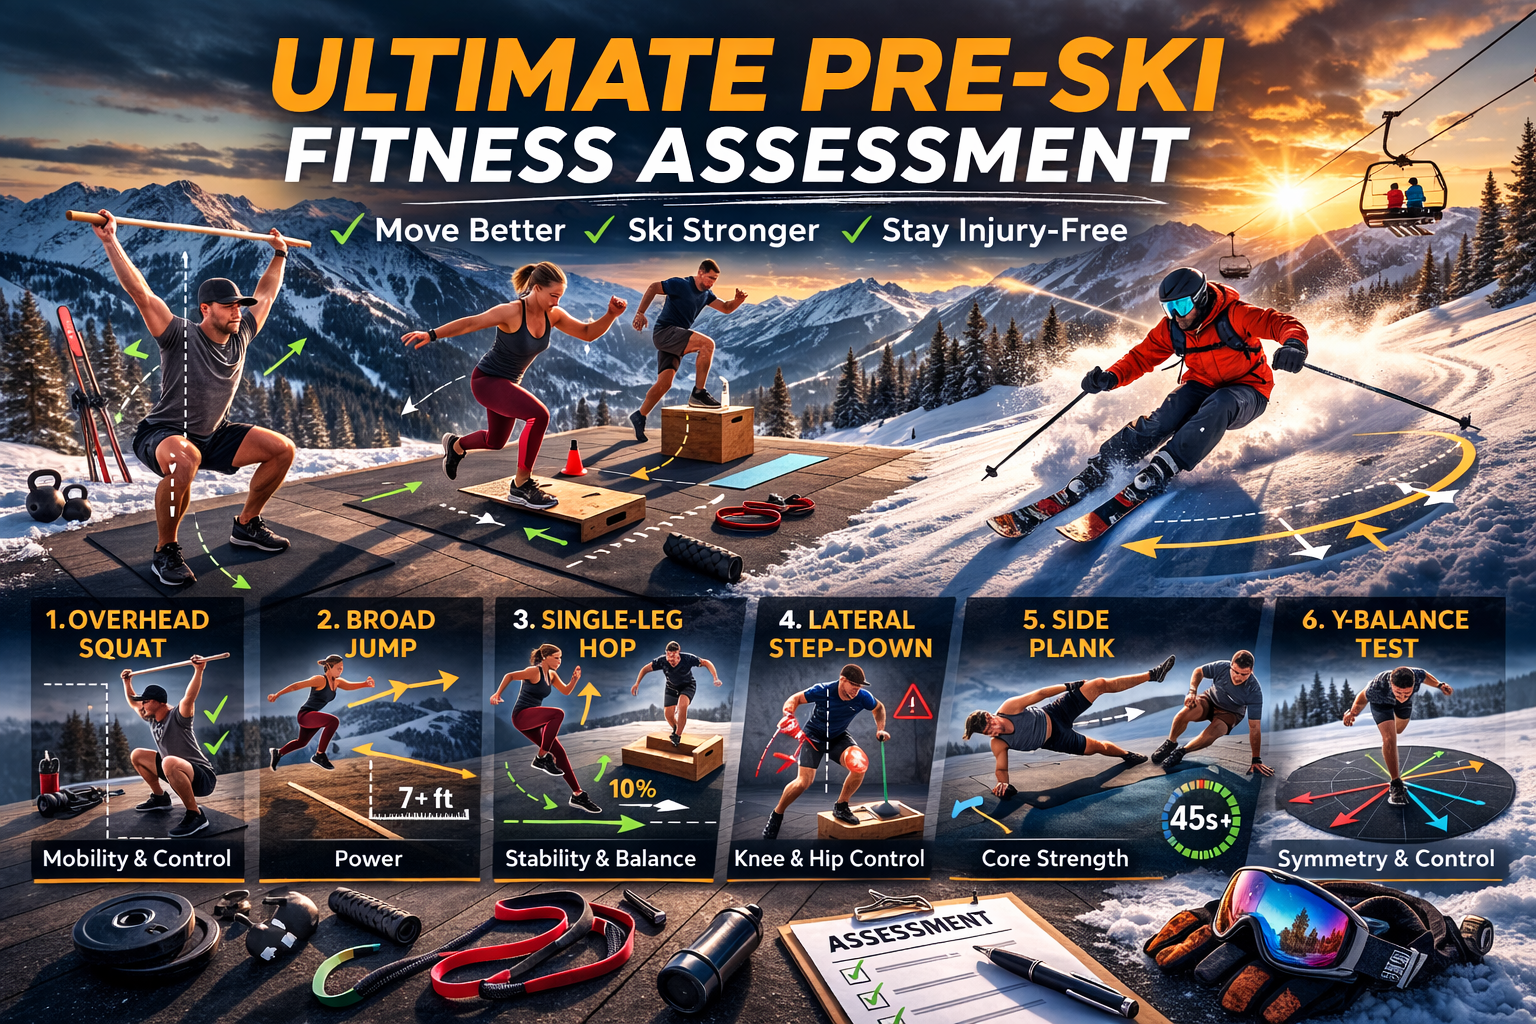
Overhead Squat Assessment — Global Movement Quality & Mobility
What This Test Measures
The Overhead Squat Assessment evaluates global movement quality, joint mobility, and neuromuscular coordination during a fundamental squat pattern. This assessment challenges the athlete to perform a deep squat while maintaining the arms overhead, requiring coordinated mobility and stability across the ankles, knees, hips, pelvis, trunk, thoracic spine, and shoulders. Because the movement requires simultaneous control of multiple joints and muscle groups, the overhead squat provides a comprehensive view of an athlete’s overall movement efficiency and mobility capacity.
The assessment is commonly used in sports performance and rehabilitation settings to identify mobility limitations, movement asymmetries, and neuromuscular control deficits.
Why It Matters
The squat pattern is a foundational movement used in many athletic activities, including:
- Jumping and landing
- Skiing and snowboarding
- Climbing and stepping onto footholds
- Lifting and lowering the body
- Absorbing force during dynamic movement
Performing the movement with the arms overhead adds additional demands on shoulder mobility, thoracic extension, and core stability. The Overhead Squat Assessment helps identify deficits in:
- Ankle dorsiflexion mobility
- Hip mobility and stability
- Core and trunk control
- Knee alignment and control
- Thoracic spine mobility
- Shoulder mobility and stability
Limitations in these areas may contribute to inefficient movement mechanics, reduced power generation, and increased injury risk.
Equipment
- Flat testing surface
- Dowel, PVC pipe, or broomstick
- Optional mirror or video recording for movement observation
Test Setup
- Stand with feet approximately shoulder-width apart.
- Toes should point slightly outward in a comfortable stance.
- Hold a dowel or PVC pipe overhead with both arms fully extended.
- Grip the dowel with a wide grip, allowing the arms to remain straight above the head.
- Maintain a neutral spine and upright posture before initiating the movement.
How to Perform the Test
- Begin standing upright with the dowel held overhead.
- Slowly descend into a squat while keeping the heels on the ground.
- Lower the hips as far as possible while maintaining control and alignment.
- Keep the knees tracking over the toes throughout the movement.
- Maintain the arms directly overhead and the torso upright.
- Pause briefly at the bottom of the squat before returning to standing.
Athletes perform 3–5 controlled repetitions while movement quality is observed.
Common Movement Faults
- Heels lifting from the ground
- Knees collapsing inward (valgus)
- Excessive forward trunk lean
- Arms falling forward from overhead position
- Asymmetrical hip shift
- Loss of spinal neutrality
These compensations may indicate restrictions in mobility, stability, or neuromuscular coordination.
Performance Insight
Strong performance indicates:
- Adequate ankle and hip mobility
- Stable knee alignment during loaded movement
- Good trunk control and posture
- Effective thoracic mobility and shoulder positioning
- Efficient coordination of the kinetic chain
Poor performance may indicate deficits in:
- Ankle dorsiflexion mobility
- Hip mobility or stability
- Core and trunk strength
- Thoracic spine mobility
- Shoulder mobility and stability
These deficits may lead to inefficient movement patterns and increased stress on the knees, hips, shoulders, or lower back during athletic activity.
Broad Jump — Horizontal Power Test
What This Test Measures
The Broad Jump evaluates lower-body explosive power and horizontal force production. This quality is essential for athletes who must accelerate, absorb terrain, and generate force through the ground — particularly in mountain sports such as skiing, snowboarding, mountain biking, and trail running.
Why It Matters
Horizontal power plays a major role in:
- Acceleration
- Terrain absorption
- Jump takeoffs and landings
- Reactive movement and agility
How to Perform the Test
- Stand with toes behind the start line.
- Jump forward as far as possible using a two-foot takeoff.
- Use an arm swing to assist the jump.
- Land on both feet and stick the landing under control for 2 seconds.
- The jump distance is measured from the starting line to the heel of the rear foot at landing.
Athletes perform two trials, and the average distance is recorded.
Invalid Attempts
- The athlete falls forward or backward on landing
- A step occurs after landing
- The athlete touches the ground with their hands
- The athlete takes multiple takeoff steps or double contacts before jumping
Performance Insight
Broad jump performance reflects an athlete’s ability to rapidly generate force through the lower body and transfer it into forward movement. Improving this quality enhances speed, explosiveness, and dynamic stability across many sports.
Triple Jump — Reactive Power & Coordination Test
What This Test Measures
The Triple Jump evaluates reactive strength, coordination, and repeated horizontal power production. Unlike the broad jump, this test challenges the athlete to produce force repeatedly while maintaining momentum and control, making it a strong indicator of athletic power and elastic strength.
How to Perform the Test
- Stand with toes behind the start line.
- Perform a Single Leg jump forward.
- Immediately upon landing, rebound into a second jump.
- Continue directly into a third jump, sticking the final landing.
- The total distance is measured from the start line to the heel of the final landing position.
Athletes perform two successful trials, and the average distance is recorded.
Invalid Attempts
- The athlete pauses between jumps
- The athlete touches the ground with a hand or the other foot
- The athlete does not stick the final landing
Performance Insight
The triple jump challenges an athlete’s ability to rapidly absorb and reapply force across multiple jumps. Strong results indicate:
- High levels of reactive strength
- Efficient elastic energy use
- Advanced coordination and neuromuscular control
Step Down Test — Single-Leg Strength & Control
What This Test Measures
The Step Down Test evaluates single-leg strength, control, balance, and lower-extremity movement quality. This assessment challenges the athlete’s ability to control the hip, knee, and ankle during a loaded single-leg squat pattern, which is fundamental for absorbing force and maintaining alignment during athletic movements.
Why It Matters
Most athletic movements occur one leg at a time — whether skiing, running downhill, landing jumps, or navigating uneven terrain. This test helps identify:
- Knee control and valgus collapse
- Hip stability and strength
- Eccentric quadriceps control
- Balance and coordination
- Muscular endurance under fatigue
Equipment
- Stable box or platform (approximately 8–12 inches / 20–30 cm high)
- Flat testing surface
- Optional metronome or tempo cue
Test Setup & How to Perform
- Stand on one leg at the edge of the box.
- The testing foot remains fully on the box, while the non-stance leg hangs off the side.
- Hands remain on hips or across the chest to prevent momentum.
- Maintain an upright torso and neutral pelvis.
- Slowly lower into a single-leg squat, allowing the opposite heel to move toward the ground.
- Descend until the heel lightly touches the floor, then return to standing on the box under control.
- Continue for 30 seconds on the same leg.
Invalid Repetitions
- The non-stance foot touches the box
- The athlete loses balance or steps off the box
- The knee collapses significantly inward
- The athlete bounces at the bottom instead of controlling the descent
- The athlete uses arms or momentum to assist the movement
- The athlete fails to reach adequate depth
Performance Insight
Strong performance indicates effective hip and knee stability, good eccentric strength and control, and balanced single-leg coordination. Poor performance may indicate deficits in gluteal strength, quadriceps endurance, neuromuscular control, or dynamic knee stability.
Side Plank Hip Abduction Test — Lateral Core & Hip Stability
What This Test Measures
The Side Plank Hip Abduction Test evaluates lateral core endurance, hip abductor strength, and trunk stability during single-limb support. This assessment challenges coordinated activation of the gluteus medius, quadratus lumborum, obliques, and deep trunk stabilizers.
Why It Matters
Strong lateral trunk and hip stability are essential for maintaining lower-extremity alignment and movement efficiency during athletic tasks such as skiing and snowboarding. The test helps identify deficits in hip abductor strength, lateral trunk endurance, pelvic stability, and core control.
Equipment & Test Setup
- Flat exercise surface or mat
- Stopwatch or timer
- Optional metronome to maintain tempo
How to Perform the Test
- Lie on one side with the elbow directly under the shoulder.
- Legs remain extended with the feet stacked.
- Lift hips to form a straight line from head to ankles.
- Raise the top leg into hip abduction and lower under control for 30 seconds or until fatigue.
- Record the total number of controlled repetitions. Repeat on the opposite side.
Invalid Repetitions
- Hips drop below neutral plank position
- Trunk rotates forward or backward
- Top leg uses momentum instead of control
- Knee bends instead of staying straight
Performance Insight
Strong performance indicates effective hip abductor strength, stable lateral trunk control, balanced pelvic alignment, and good muscular endurance of the lateral kinetic chain.
Anterior Reach Test — Dynamic Balance & Neuromuscular Control
What This Test Measures
The Anterior Reach Test, derived from the Y‑Balance Test, evaluates dynamic balance, ankle mobility, hip stability, and neuromuscular control during single-leg stance. It challenges the athlete to maintain stability on one leg while reaching forward with the opposite limb.
Equipment & Test Setup
- Y-Balance testing kit or measuring tape placed on the floor
- Flat testing surface
- Tape marker for the stance foot position
How to Perform the Test
- Stand barefoot or in athletic shoes on one leg at the center of the testing area.
- The stance foot remains planted with the toes aligned with the starting line.
- Hands remain on the hips while the opposite leg reaches forward as far as possible and lightly taps the floor.
- Perform three successful trials per leg and record the maximum reach distance.
Invalid Repetitions
- Stance foot lifts or shifts from starting position
- Athlete loses balance or touches ground with hands
- Reaching foot places full weight on the floor
Asymmetry & Performance Insight
Compare reach distance between limbs. A difference greater than 4 cm may indicate a meaningful asymmetry that could increase injury risk. Strong performance indicates effective ankle mobility, hip and knee stability, and neuromuscular coordination.
Interpreting Your Results
If you notice meaningful left-to-right differences, poor control, or limited mobility, use these results to guide preseason training:
- Mobility deficits → focus on ankle and hip mobility work
- Power deficits → integrate plyometrics and strength
- Stability deficits → prioritize single-leg and core control exercises
Final Thoughts
Skiing is a blend of power, endurance, balance, and flow. Spending 20–30 minutes on a structured assessment can help you train smarter, perform better, and reduce injury risk once the snow flies.
"The difference between peak performance and preventable injury often comes down to 20 minutes of honest assessment and a willingness to address what you find."
If you'd like a guided plan to build on your results, let me know and I can add the 12-Week Ski Strength & Conditioning Program details.